Keyboard Cleaning: How It’s Done and Why It’s Needed
August 4, 2022
/
Keyboard Cleaning: How It’s Done and Why It’s Needed
Keyboard Cleaning: How It's Done and Why It's Needed
When was the last time you cleaned your keyboard? If the answer is "never", or "I don't remember", then your keyboard is probably full of dust, bits of food, hair, human and non-human DNA (if you have a pet) and more. In this guide we will see in detail how keyboard cleaning is done and why it is necessary.Why should I clean my keyboard?
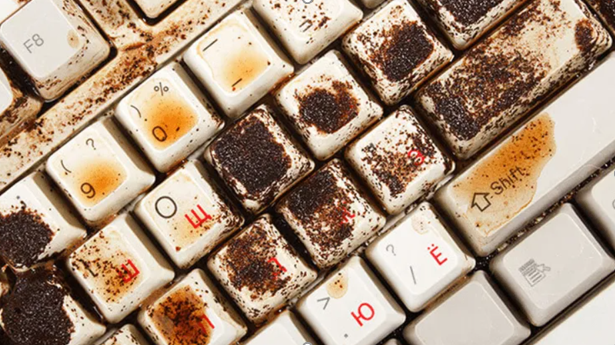
Very good question, why bother cleaning a keyboard? After all, we might like dirty children… Dirty objects.However, if seeing the image above gave you chills or a tendency to feel nauseous, read on.Although we may often clean our desk of dust, we neglect the hygiene of our keyboard and mouse, despite the fact that they are tools that we usually use and touch every day.A 2008 study found that keyboards in shared offices typically contain more bacteria than a toilet seat.But beyond the point of view of hygiene and aesthetic image, a dirty keyboard can be under-functioning.Most of the time the keys get stuck, when they are pressed multiple times, or when they are not pressed at all, the problem when caused by dust and debris that has collected inside it.It is known, after all, that the most common thing one finds inside one's keyboard is sesame seeds.A good watch cleaning, therefore, is necessary, so that we can avoid the above problems.What tools does keyboard cleaning need?
To proceed with the cleaning, we will need some simple tools and items, most of which are found in every household. In short, we need:- a screwdriver
- a bowl of warm water
- swabs
- isopropyl alcohol
- a towel
- a natural or spray convinced air
- hair dryer (optional)
Keyboard Disassembly
The first thing we need to do is to disassemble our keyboard.Before we start, it's a good idea to take a picture so we know where to put the keycaps once the keyboard cleaning is done.Note here that each keyboard may require a slightly different disassembly procedure than the one we will describe. With a search for your model on YouTube, you'll likely find a video of the respective keyboard being disassembled.Our keyboard is mechanical, but the same logic applies to all keyboards.It's time to disconnect our keyboard from the computer's USB port.After photographing the keys, we can start by removing the top frame of the keyboard. Clearly, it's easier to clean a frameless keyboard.Depending on how dirty our keyboard is, or if we don't want to lose the warranty by unscrewing it, if we can just go ahead with the key placement.Our keyboard had an outer frame, so we'll show all the disassembly.We start by removing all the screws from the bottom of the keyboard.Usually some or some screws that are hidden under a sticker. We should tear the sticker and remove.Attention: If we remove the sticker, we automatically lose the warranty for the keyboard. You proceed at your own risk. PCsteps is not responsible for any damage to your keyboard.Remove keys
When we are done with all the screws, we continue with the removal of the keys.Most watches, especially mechanical ones, come with a special keycap puller in the package.If you don't have such a tool at your disposal, you can make some of your own construction. In the picture below you will find some ideas for DIY key removal tool.So then we remove all the keys.We should be especially careful with the larger keys, such as Enter, Shift, etc., because they are supported by a metal part underneath.Even more attention should be paid to the spacebar, which usually has some springs. We place the springs in a safe place, because they are vital for the correct operation of the button.After removing all the keys, we finally have the main body of the keyboard.In most cases, there are additional screws holding this board to the back cover of the keyboard.We remove them, so that we can also clean the lid well.How to clean a keyboard
So far we have seen the disassembly. But it's time to move on and see how keyboard cleaning actually works.Keys
The easiest to clean would be the keycaps. Once we've removed them, all we have to do is submerge in hot water. Then we use a cloth or a soft sponge to rub them.Our sponge should not have a wire, because we can scratch the surface of the keys. In addition, the water should not be hot.If our keys are very dirty, we can also add a few drops of liquid detergent to soap them. Obviously, we don't use bleach or any other kind of strong cleaner.When we are done washing, wipe the lids with a dry towel. Then we leave them in a warm place to dry. Under no circumstances do they have the slightest trace of moisture before we put them back in place.If we wish to speed up the process, we can use a hair dryer. But be careful with the temperature, we don't want the plastic to soften or melt.Keyboard main body
The most dirt is usually hidden under keys, and this is where cleaning a keyboard requires a lot of patience.In our case the keyboard was not particularly dirty, as we take care of its regular cleaning. Yet our eyes have seen much worse.Anyway, we take the keyboard under our arms, go outside, turn it upside down, and start shaking. A small blower is all you need to "blow the lot away". A spray of compressed air can do the same job.Once we're done, we take some cotton swabs with alcohol, and start the thorough cleaning between the keys.We draw attention again, as we must not put too much alcohol on the swab. We don't want any liquid to drip into the board.Outer frame
The top and bottom bezels of a keyboard are usually plastic and more rarely metal. In short, there is no problem if we wash them with water and they do not need any special attention.We just make sure to dry very well before we start assembling.Membrane keyboard
Cleaning a membrane keyboard is no different from the method we described above. The caps on these keyboards come off the same way.So we follow the same procedure, without of course finding the membrane.Laptop keyboard
As for the laptop, cleaning the keyboard is quite a bit more difficult. The keys of such a keyboard have scissor-type switches, which are not the easiest to disassemble and assemble.Additionally, they are relatively more fragile than the switches we described above, making them prone to breakage. For more details on keyboard switches, see our detailed guide.So clearly, cleaning a laptop keyboard should be done with cotton swabs, alcohol, and a donkey's patience.In general, we can start by using a natural or conditioned air spray to remove most of the dust and debris. It goes without saying that whatever we do, we always do it with the laptop turned off.Then, using a small amount of isopropyl alcohol on a cotton swab, we pass all the surfaces between the keys, until the clock is clean.Why choose professional cleaning of your practice?
Fitting
After the keyboard cleaning is done, we need to assemble all the pieces. To do this, we just have to follow the disassembly process in reverse.The only points that might make it difficult for us are the keys with the metal part and the spacebar. Below you will see a video on how we can put them correctly in place.After everything is as it should be, it's time to put the keyboard in a USB port, and check if all the keys are pressed correctlyThe keyboard cleaner of the lazy
We recommend that you clean your keyboard using the method we described at least once or twice a year.However, there is also an easier, but less thorough way of cleaning, which we can use more often. In this method we will only use alcohol, swabs, and a blower.In essence, the only difference is that we will not disassemble the entire keyboard, unscrewing the surrounding frame.So we start by turning the keyboard upside down, and shaking out all the junk it has collected. The blower or convinced air that once again comes in handy.Then, we take the swabs, classically put some alcohol, and start rubbing between the keys. In most cases we can use the alcohol on the keys as well, although there are caps that may discolor if we do this.Cleaning the keyboard in the above way does not take more than 10 minutes. When we're done, it's a good idea to let the keyboard dry for a few hours before using it.We can repeat this process weekly or monthly to keep our keyboard clean. So we don't have to disassemble every time a crumb falls between the keys.Alternatively, of course, we can not stop in front of the computer. Rumor has it that there are special pieces of furniture on which we can eat, so-called "tables", but we don't swear. We believe that it is probably a natural myth.How often do you clean your keyboard?
Tell us the truth, how dirty is your own keyboard? Do you clean it often or not at all? How many sesame seeds did you find inside?If you liked our guide or if you have any questions about how to clean a keyboard, write us in the comments. Read hundreds of articles that will answer any question about #cleansecta by clicking here.Recent Posts
cleansecta.gr
Mosquito protection measures
cleansecta.gr